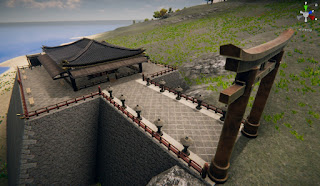
Today I did a quick project in Unity3D of a Japanese style outdoor pavilion and public gathering place. It's the Tenge Pavilion, which is on the same island as my other 3 projects. It only took a couple hours for the whole project, and is with the intention that I can explain some of the construction better. In this project, I needed to find the proper spot and smooth the approach terrain to a usable height and flatness. So here, I started on this part of the map.
First I put in the rough flooring and base structure so I have a starting point. I wasn't looking for a large structure on this, so the foundation is enough, as well as being shown as properly supported. So this is what I ended up with.
The front corner looks undone, but there is a secondary foundation built there. It would have been easier to raise the terrain, but sometimes the details are better this way. Nothing shows complacency like big gaps showing the inside of things. This way, the base is impenetrable. It has colliders built in so it's a one way force field. If a player walked in underneath, they wouldn't see the base walls or the flooring. It's just sloppy crafting to see that in other games. My projects have a great deal of consistency when it comes to fixing and removing seams and gaps. Everything is meticulously aligned and fitted. After the base was completed, it needed a railing system. So this is what it got. It is actually part of a balcony asset category, but I lowered the attached platform underneath the floor to remove it from being seen.
So now the basic infrastructure is roughed in, I could start on the main pavilion. As you can see, there are things you shouldn't be able to see through. The gable was all laid in by hand and squared off. There are 10 individual pieces in the gable system. The roofing came next and all the separate panels were all lined up meticulously so no gaps or seams would show. This consists of 24 separate pieces. This is where it ended up.
Pic 1 is the top down from the gable. It's common for many assets to only have an outside view, as they are meant to be covered up by another asset. Looking up from underneath shows the full visual install. Notice the hole in the center. Pic 2 is the underside view of the gable. In this case I had to invert and resize a piece of 8x8 flooring panel to cover the center hole, but to also look as naturally in place as could be done. 3rd pic is with the roofing installed.
At this point it is just 'dressing up' the scene as many fixtures were added. It also had to be centered. In Asian architecture, I like to make extra sure there is a definable symmetry as it adds to the visuals and 'flow' of the structure. The next 8 pics are of various stages of completion. More railings, some lighting, benches and canopies (for vendors or food servers) were added to create a usable space. It is very open and accessible, yet the boundaries still exist in a neutral and fluid visualization.
There are many things that could have been added, but I was striving for simplicity and functionality. Small details like vendor product, fires, baskets, and statues would have fit in well and added to the overall details, but as I said, I was aiming for simplicity.
That's pretty much it for this project. It was intended to be a fundamental instructional for those just starting out in Game Level Design. I hope you enjoy the view, and spending a couple of minutes watching what I do in a typical day.


No comments:
Post a Comment